
Applicable Products

Introduction
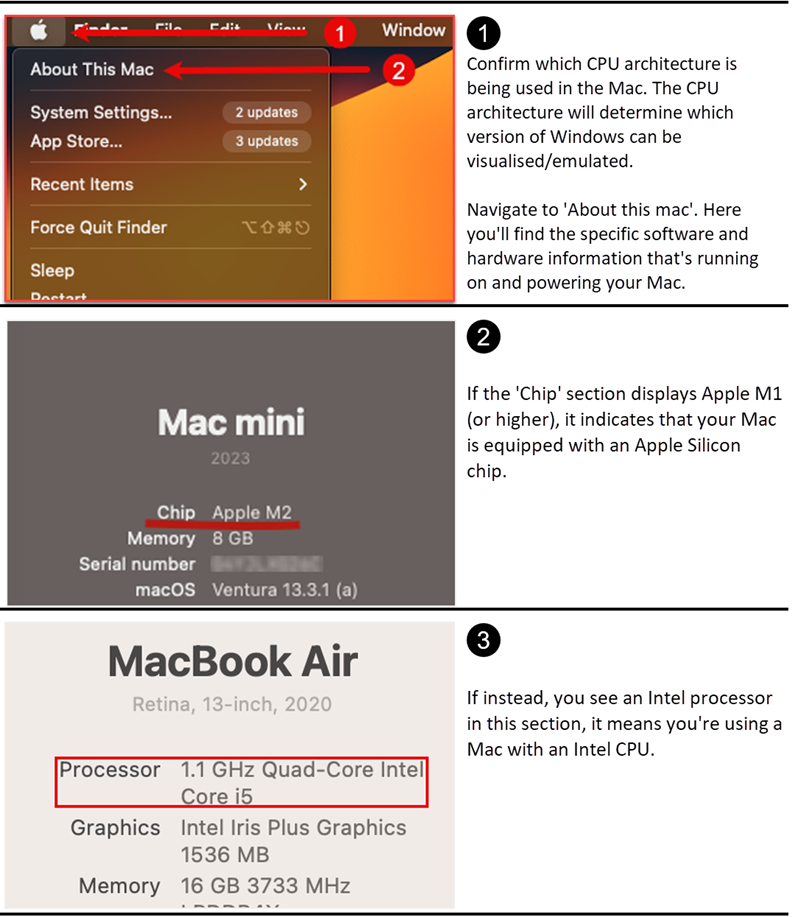
With the increasing need for compatibility with Windows applications and software, setting up a virtual machine (VM) on macOS has become a popular solution. Virtualization software allows users to create a virtualized environment within macOS, enabling the installation and operation of Windows alongside macOS.
Objective
This application note provides a comprehensive guide for setting up a Windows virtual machine on macOS using UTM virtualisation software. By following these step-by-step instructions, users can seamlessly run SirettaSPARK and other Windows applications on their macOS devices without the need for separate hardware.
Completion Time
The outlined steps are anticipated to require approximately 30 to 40 minutes for completion.
Requirements:
• A macOS device with sufficient resources (RAM, CPU, storage).
• A valid Windows installation ISO or disk image file.
• UTM Virtualisation software installed.
• CrystalFetch software installed.
Prerequisites
Before proceeding, ensure the following things are checked:
Procedure
Installation of CrystalFetch
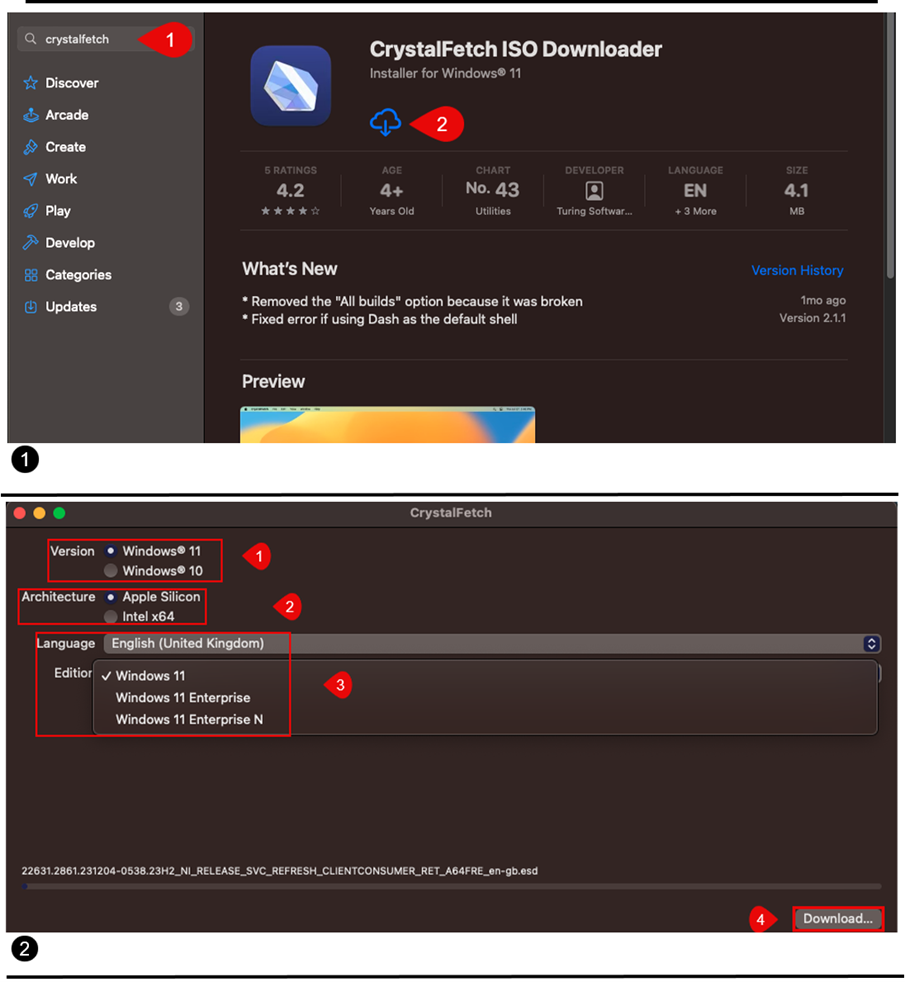
1. Open the App store and search for ‘CrystalFetch’.
– Download and install CrystalFetch.
– Launch the CrystalFetch application.
2. Select which version of Windows you would like to install.
– Choose the architecture that corresponds to the system being used.
– Choose your preferred language followed by the edition of Windows, then click ‘Download’.
– Take note of the download location, as this file will be needed later.
Installation of UTM
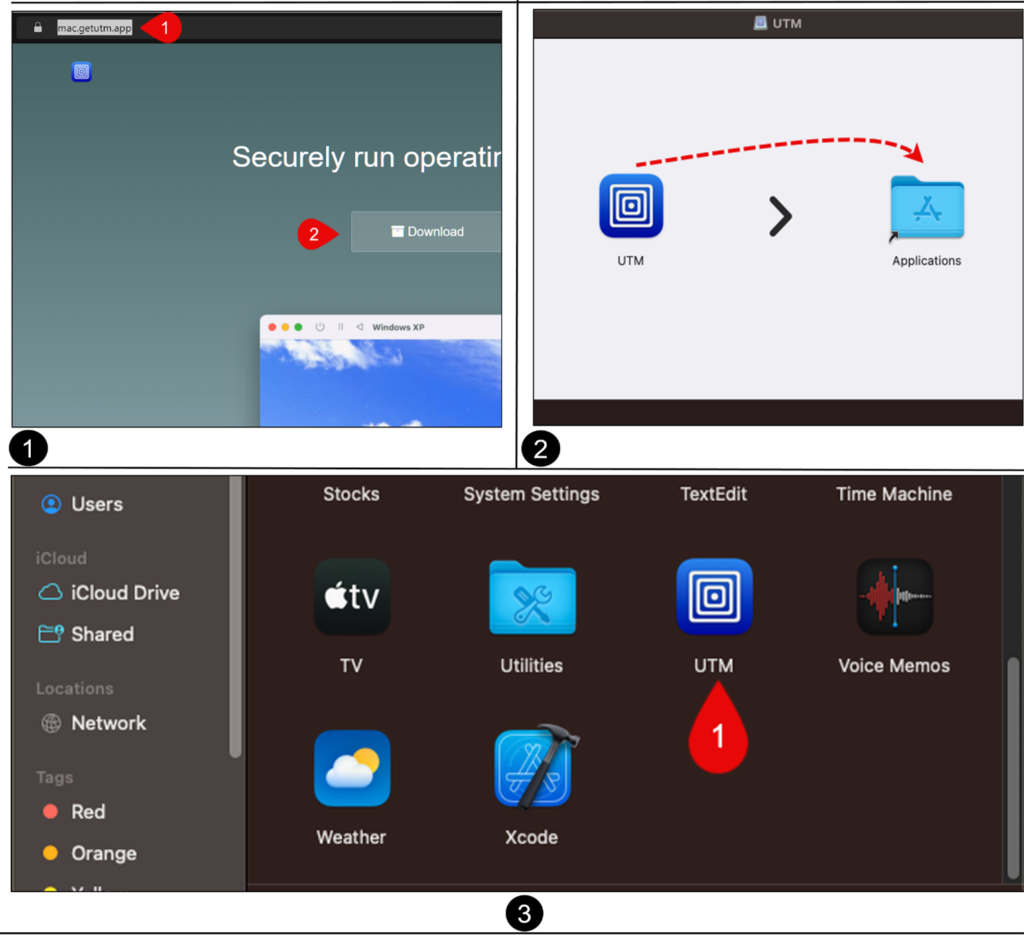
1. Navigate to mac.getutm.app to download the latest version of UTM.
2. Open the disk image file (.DMG) then drag and drop the UTM app into the applications folder.
Launch the UTM application.
Configuring the virtual machine
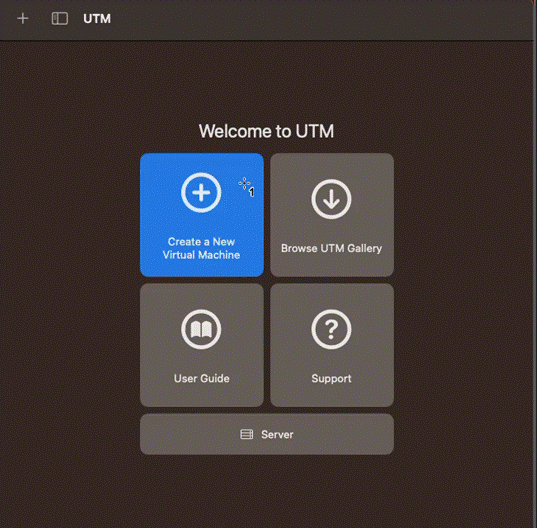
1. Select ‘Create a new Virtual Machine’.
2. Select either ‘Virtualize’ or ‘Emulate’ then ‘Windows’.
Note: Apple silicon processors do not support virtualizing Windows 10; however, they can run Windows 10 through emulation. If you wish to run Windows 10 on an Apple silicon processor, opt for emulation instead of virtualization.
3. Check both ‘Install Windows 10 or higher’ and ‘Install drivers and SPICE tools’.
4. Click ‘Browse’ then navigate to the ISO image and select it, then click continue.
5. Allocate an appropriate amount of memory and CPU cores to the VM, taking into account the total amount available on your device.
6. Allocate an appropriate amount of storage: The minimum requirement for Windows 11 is 64GB.
7. Optionally, select a directory to make accessible within the VM.
8. Press ‘Save’ to create the VM then the play icon to start.
Configuring Windows
• Following the initial splash screen, when prompted, press any key to start the Windows installer.
Note: If you have any issues with the mouse, press the mouse capture button in the toolbar to send mouse input directly, alternatively, press Control + Option together.
• Follow the on-screen instructions. You’ll be asked to perform a few tasks such as connecting to Wi-Fi and choosing some preferences.
• Once complete, you will have a fresh new installation of Windows.

SirettaSPARK setup
Installation
To download SirettaSPARK, please visit the link below.
• https://www.siretta.com/sirettaspark (SirettaSPARK Direct Link)
The downloaded file, SirettaSPARK.exe, is an executable file. No installation is required. Consequently, it will not appear in Windows Apps & features and if no longer required it can be deleted – no un-install process is required. Double click SirettaSPARK.exe to run the application. When run for the first time, the ‘Set Key’ pop up window will also appear:
Double click SirettaSPARK.exe to run the application. When run for the first time, the ‘Set Key’ pop up window will also appear:
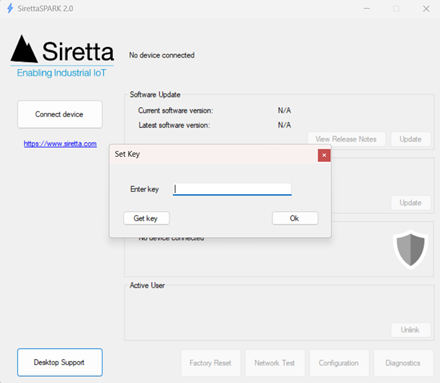
When this happens, click the ‘Get key’ button on the pop-up box to be taken to the Siretta Portal website, https://portal.siretta.com. A first-time user of the Siretta Portal will first have to register to use the web site. Returning visitors may continue to sign in. The activation key required is found at the very bottom of the web page. This key is unique to the user logged into the portal.
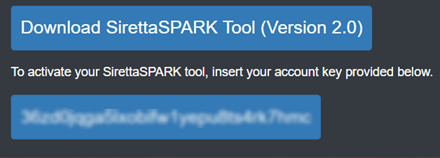
Click the blue key box to copy the key to the clipboard. The box turns green to confirm that this has happened. Paste the key from the clipboard into the SirettaSPARK pop up box and click ‘OK’ to complete the activation of the SirettaSPARK application. A confirmation will pop up saying Key accepted. Activated user:. Confirm that the account name is correct. Activation of the SirettaSPARK tool is now complete and access to SirettaSPARK and its functionality is enabled.
For further guidance on using SirettaSPARK, please refer to the SirettaSPARK user manual. A link to this can be located in the appendix.
Additional reading
| Description | Author |
| SNYPER-IoT Graphyte (GL) Datasheet | Siretta |
| SNYPER-5G Graphyte (GL) Datasheet | Siretta |
| UTM Windows 11 Guide | UTM |
| SirettaSPARK User Manual | Siretta |
