
Applicable Products
| Part number | Description |
| QUARTZ-22-LTE (EU) | Dual Port Dual SIM LTE Router (EU) |
| QUARTZ-22-UMTS (EU) | Dual Port Dual SIM UMTS Router (EU) |
| QUARTZ-COMPACT-11-LTE (EU) | Single Port Compact LTE Router (EU) |
| QUARTZ-COMPACT-11-UMTS (EU) | Single Port Compact UMTS Router (EU) |
| QUARTZ-COMPACT-G11-LTE (EU) | Single Port Compact LTE Router (EU) with GPS |
| QUARTZ-GOLD-21-5G (GL) | Dual Port Gigabit Ethernet 5G NR Router (GL) |
| QUARTZ-GOLD-W21-5G (EU) | Dual Port Gigabit Ethernet 5G NR Router (EU) |
| QUARTZ-GOLD-W21-5G (GL) | Dual Port Gigabit Ethernet 5G NR Router (GL) |
| QUARTZ-GW22-LTE (EU) | Dual Port Dual SIM LTE Router (EU) with GPS |
| QUARTZ-LITE-21-LTE (EU) | Dual Port Small Footprint LTE Router (EU) |
| QUARTZ-LITE-21-UMTS (EU) | Dual Port Small Footprint UMTS Router (EU) |
| QUARTZ-LITE-G21-LTE (EU) | Dual Port Small Footprint LTE Router (EU) with GPS |
| QUARTZ-LITE-G21-UMTS (EU) | Dual Port Small Footprint UMTS Router (EU) |
| QUARTZ-LITE-GW21-LTE (EU) | Dual Port Small Footprint LTE Router (EU) with GPS |
| QUARTZ-LITE-GW21-UMTS (EU) | Dual Port Small Footprint UMTS Router (EU) |
| QUARTZ-LITE-W21-LTE (EU) | Dual Port Small Footprint LTE Router (EU) |
| QUARTZ-LITE-W21-UMTS (EU) | Dual Port Small Footprint UMTS Router (EU) |
| QUARTZ-ONYX-GW42-5G (GL) | Quad Port Gigabit Ethernet 5G NR Router (GL) with GPS |
| QUARTZ-ONYX-W42-5G (GL) | Quad Port Gigabit Ethernet 5G NR Router (GL) |
| QUARTZ-W22-LTE (EU) | Dual Port Dual SIM LTE Router (EU) |
Objective
An advantage of using a powerful industrial router is the ability to send and receive data securely over an encrypted connection. This offers a user the ability to keep data secure between two endpoints by allowing the connected equipment to send data across an encrypted network connection securely without any changes to the configuration of the equipment using well defined security protocols. This document explains how to connect the Siretta router family to a server over a L2TP VPN tunnel.
Solution
The Siretta range of Industrial Quartz Routers support the followings VPN protocols:
• GRE
• OpenVPN Client
• L2TP/PPTP Client
• IPSec
Before you start the process of establishing an L2TP VPN connection between a Siretta router and a server, please obtain the following details:
1. L2TP VPN Server IP address
2. L2TP Username and password
These details are available from your network administrator for your VPN server.
NOTE: If you do not have your VPN Server details to hand then you can obtain temporary test details from the following link ‘http://www.vpngate.net/en/‘ to allow you to check the VPN functionality of the router.
Router VPN Configuration
1. Make sure your router is connected to the internet and showing Internet status page as shown below (See Router Quick Start Guide):

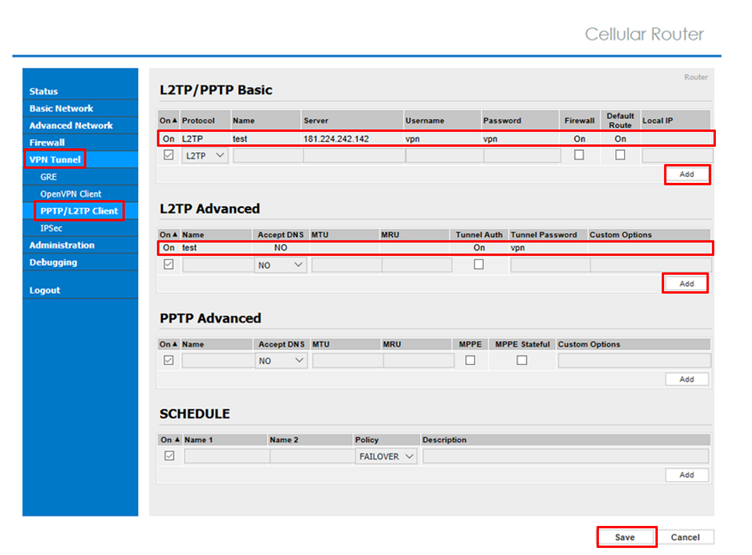
2. Select the ‘VPN Tunnel’ tab on the left-hand pane of the Siretta router web interface.
3. Choose ‘L2TP/PPTP Client’ tab and you will be presented with a number of options.
On this page you can enter the server details for the VPN connection by choosing the following:
• Under protocol click on the drop-down selection and choose L2TP.
• Name the connection by filling in the name field.
• Enter the VPN server username under the username field.
• Enter the VPN server password under the password field.
• Choose if you want to enable the firewall and select the local IP address.
• Click ‘Add’ to add the connection.
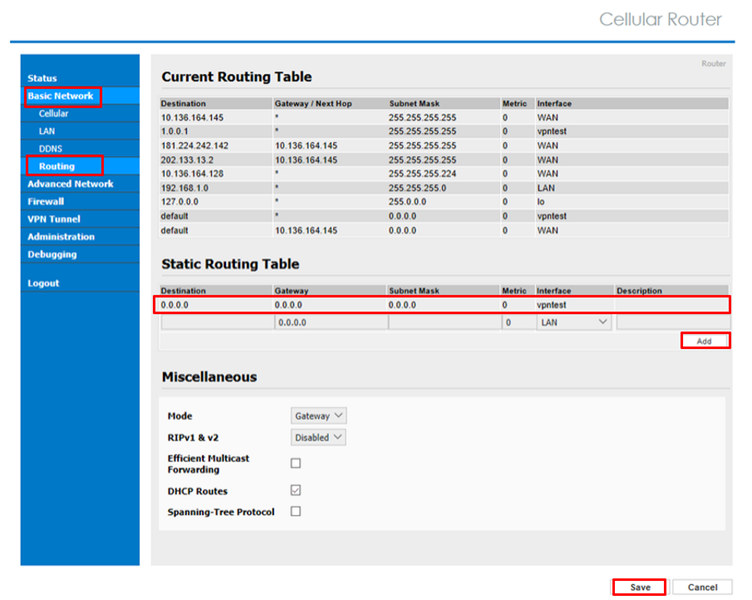
4. Click ‘Basic Network ‘on the left-hand pane of the router GUI.
5. Choose Routing’ to show the current routing table.
6. In the Static Routing Table you need to add a new entry.
7. Set ‘Destination’, ‘Gateway’, ‘Subnet Mask’ to ‘0.0.0.0’
8. Set Metric to ‘0’
9. Choose the VPN interface setup for the L2TP connection. (In this example the VPN connection is called ‘vpntest’ and can be selected from the dropdown menu.)
10. Click ‘Add’ button
11. Click ‘Save’ button.
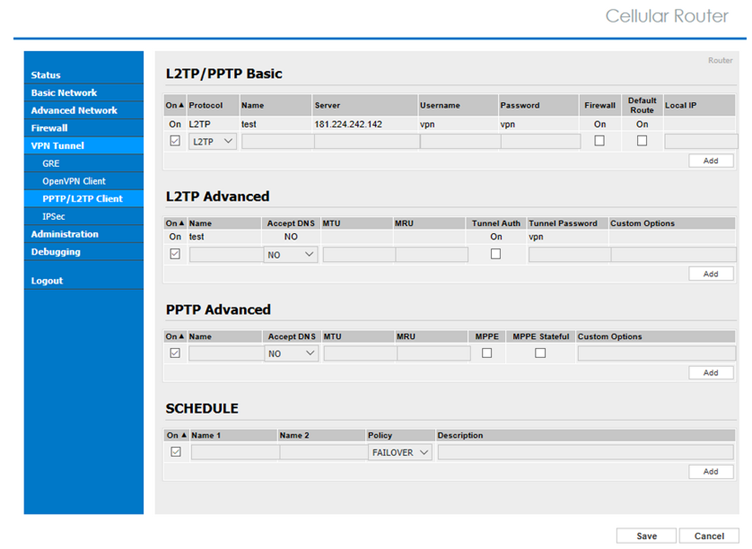
12. Select the ‘VPN Tunnel’ tab on the left pane and choose ‘L2TP/PPTP Client’ tab, you should see “Default Route” is checked to on as shown below.
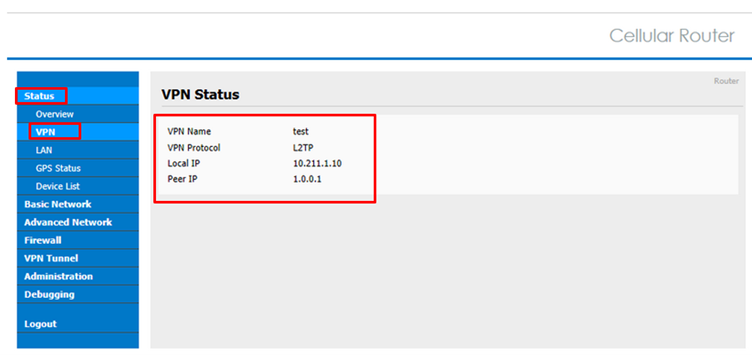
13. Click on ‘Status’
14. Select ‘VPN’
15. You will see the connection status indicating a connection between PPTP VPN server and router which is PPTP VPN client as shown below.
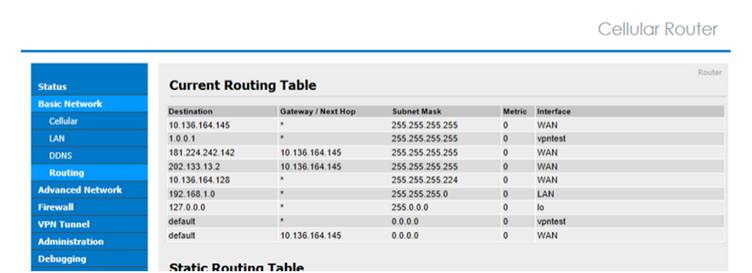
16. You can check the current routing table by selecting ‘Basic Network’
17. Select ‘Routing’.
18. You will be presented with a table showing the ‘VPN test’ connection indicating traffic through VPN tunnel (See below).
19. You can open the following link https://ipcim.com/en/?p=where using the PC attached to the Router and you will be presented with the screenshot below showing your location is Peru. This is using the VPN server from the example.
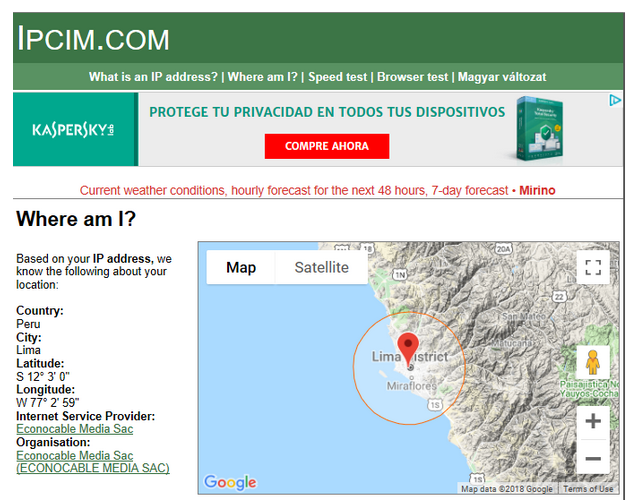
NOTE: When you open https://ipcim.com/en/?p=where while not connected to the VPN server your exact location will be displayed.
Additional Reading
| Description | Author |
| Router Quick Start Guide
|
Siretta |
